Content Refiner
Upgrade, fine-tune, or translate your existing content.

Agility Writer
Last Update 2 tahun yang lalu
Content Refiner is a tool that makes your content better. It works on many parts of your text... style, tone, who it's for, how it's told, and what language it's in. This tool changes your words to fit what you want and need.
Think about an article full of extra words, hard to read, and not well-written. Content Refiner can fix it up. It'll make your writing clear and easy to understand.
It can also make your tone more professional and convincing, add the right keywords for search engines, and even translate your main points into other languages.
With Content Refiner, you're not just rewriting - you're transforming your content. It's like having a smart assistant that knows just how to polish your writing. Whether you need to improve quality, clarity, or grammar, this tool has got you covered
Use Cases
- SEO Enhancement: Polish your content with key phrases to climb up search rankings. This text improvement helps your articles shine online.
- Audience Targeting: Tweak your writing to grab different readers' attention.
It's like giving your text a makeover for each group you want to reach. - Tone Consistency: Adjust how your words sound to match your brand's voice. Think of it as making sure all your content speaks the same language.
- Multilingual Reach: Turn your articles into different languages. This way, you can chat with folks all around the world.
- Content Modernization: Freshen up old stuff to meet today's standards. It's like giving your outdated text a new coat of paint.
- Chain Prompting: Manage complex writing tasks that require multiple prompts, fine-tuning the output step by step.
Get Started
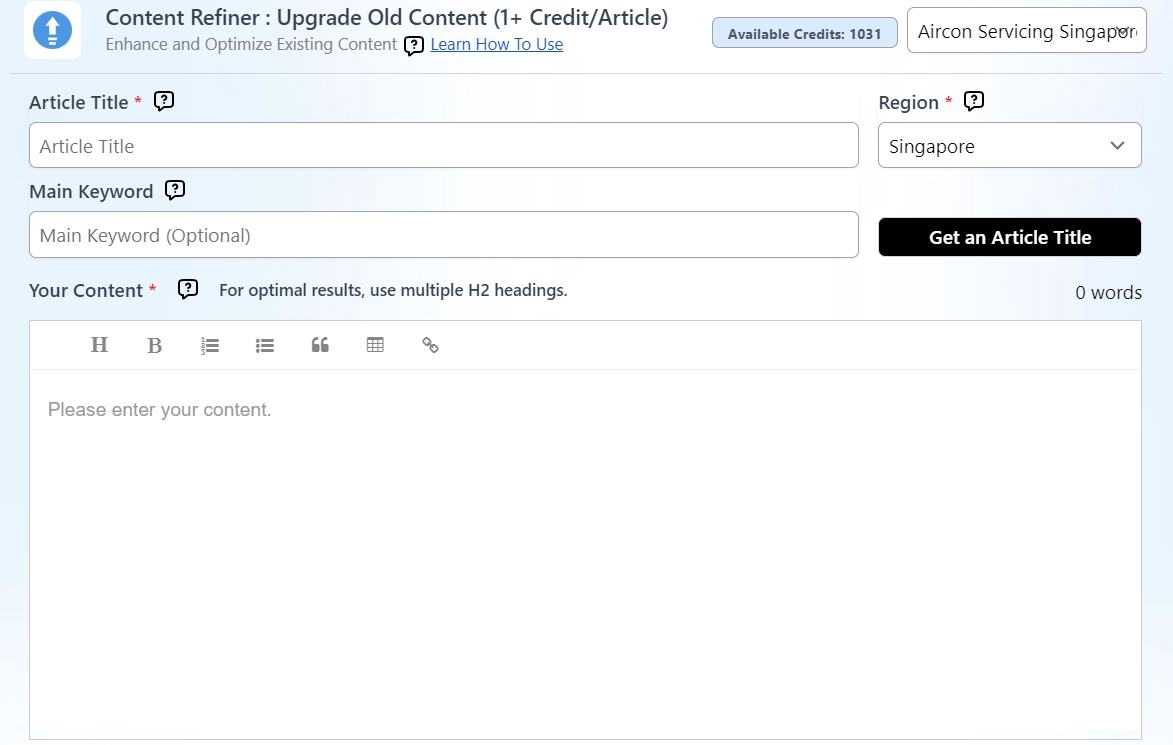
Step 1. Setting up your article
- Enter your article title and main keyword.
- If you wish to rewrite the title, use the Get an Article Title feature
with your target keyword and region. It will analyze data to give you the best article title match. - Enter or paste your content. Please ensure that the whole article is formatted using headings (H2, H3 etc). Make sure you use headings (H2, H3, etc.) for the whole article. For better results, take out any pictures.
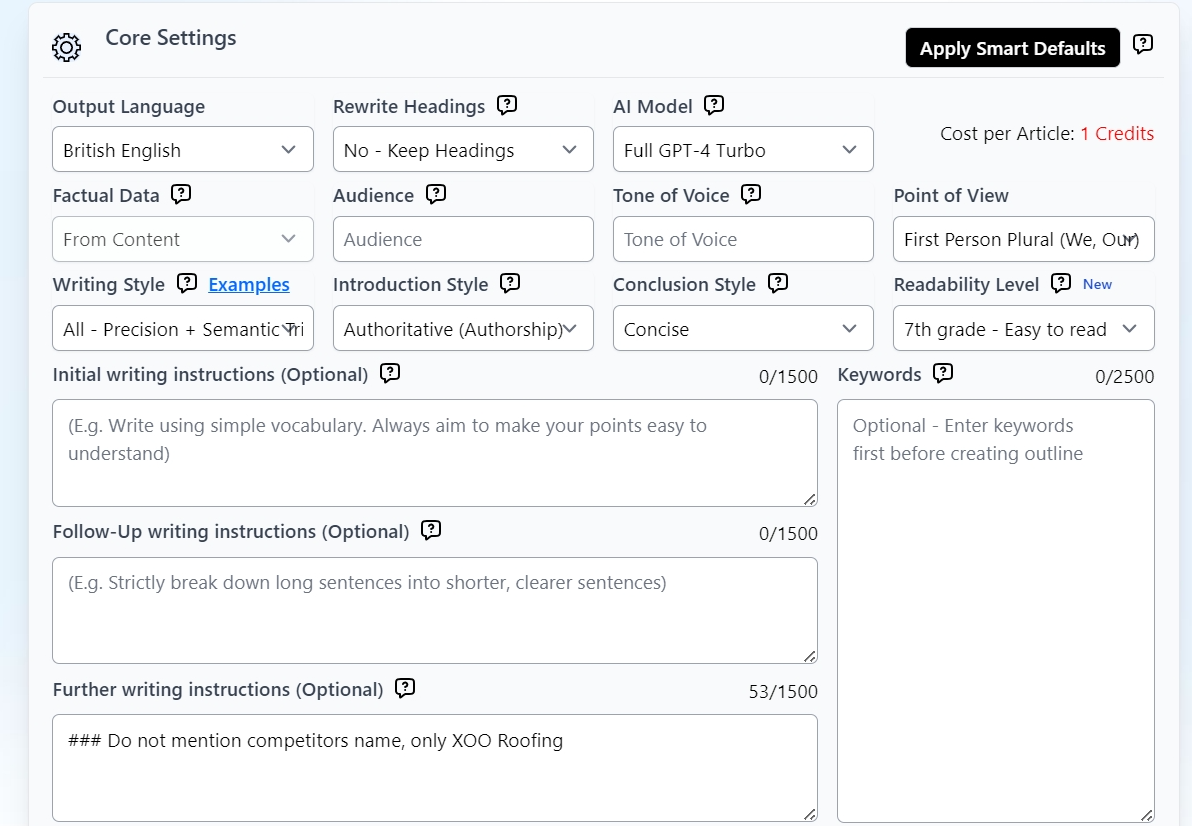
Step 2. Core settings
With your title and content set, it’s time to configure how to transform your content . Here are the key features you should not miss:
Output Language
Advanced mode offers more than 15 output language options including Non-English such as Malay, Japanese, and Chinese.
Article Length
You can set this up manually and set it up to 5000 words. With Auto mode, the system can generate the most optimized number of headings (H2 & H3 headings) for your topic based on other similar articles online. You can also customize your generated outline after this result.
AI Model
You may choose your preferred AI model:
- Full GPT-4 Turbo - Handle complex tasks using full GPT-4 model. Cost 1 credit per 2000 words.
- Full GPT-4o (Omni)- Newest premier AI model from Open AI. Cost 1 credit per 3000 words.
- Claude 3.5 Sonnet - Best AI model from Claude. Cost 1 credit per 3000 words.
Factual Data
Our system will take the input content to transform the article.
Audience
Specify the group of people you want to talk to with your article. Examples: Homeowners, students, business owners, etc.
Tone of Voice
Let the system know the writing style or tone here. Example: professional, informal, educational, etc.
Point of View
Set the author’s point of view here.
Writing Style
This feature allows you to personalize the article style further based on your niche. Among the choices are Conversational, journalistic, academic/technical, personal, and authoritative.
You may also refer to this link for more information on how to customize your writing style.
Introduction Style
You can choose to add an extra introduction for your article:
- None – Do not add any introduction.
- Concise - write a short and concise introduction.
- Engaging - write an interesting and more extended intro.
- Authoritative (Authorship) - Engaging intro with the author's expertise to build credibility. Make sure to include the Author's background in the project settings
Conclusion Style
You can choose to add an extra conclusion for your article:
- None – Do not add any conclusion.
- Concise - write a short and concise conclusion
- Engaging - write an interesting and more extended conclusion
Readability Level
Select the readability level from 5th grade to 16th grade. While improving the readability score, note that it may shorten the article. The outcome depends on the AI model, niche, and writing style. Claude 3.5 Sonnet is particularly effective at matching reading levels. For a better chance of bypassing anti-AI detection tools, choose the 5th grade level.
Initial Writing Instruction for every section
- Start with the first prompt/instruction to guide the beginning changes to the content. This prompt should focus on the main idea or key point that needs improvement.
- Our system will apply the instructions while writing each section. Do not enter background data.
Follow-Up Writing Instructions for every section (Chain Prompting)
- Use the second prompt to build on the initial changes. This can be used as part of the chain prompting to improve your content step by step.
- This prompt is optional and usually used when the content needs more complex instructions or additional refinement.
- Our system will apply the instructions while writing each section. Do not enter background data.
Further Writing Instructions for every section (Chain Prompting)
- You can use a final prompt to polish your content. This is part of chain prompting, which helps you make your writing better step by step.
- You don't always need this prompt. It's mostly for tricky instructions that need extra tweaks. These tweaks make sure your text is easy to understand, well-organized, and fits the style you want.
- Our system will apply the instructions while writing each section. Don't put in background info here.
Keywords
- Enter your terms or keywords here. We will try to add the relevant terms to the article.
- One term per line or use commas as the delimiters (we will ignore special characters and numbers).
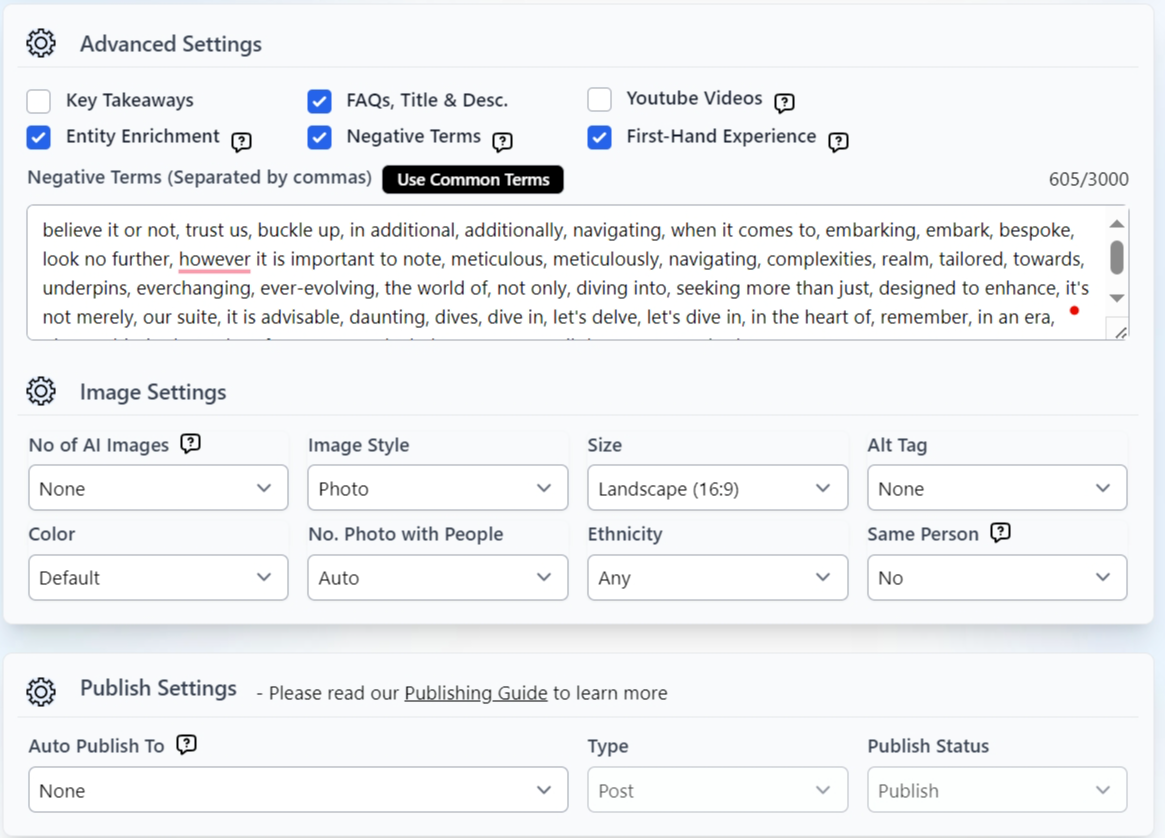
Step 3: Advanced Settings
This is for your additional customization needs, although majority of the setting options can be already addressed in your core settings. Below are some of the options that you may find helpful:
1. Key Takeaways
Tick this option if you want to include quick summaries of your article.
2. FAQs, Meta Description, and Title
Need to use more keywords? Maximize your keywords by using them in your FAQs and meta description.
3. YouTube Videos
Will automatically add YouTube videos in your first three headings (H2)
4. Entity Enrichment
Add entities and important terms from the top search results to increase entity density.
5. Negative Terms
Instruct AI to avoid specific negative terms, separating each word by commas.
6. First-Hand Experience
Incorporate personal insights and experience at various points in the article to enhance its Experience, Expertise, Authoritativeness, and Trustworthiness (E-E-A-T). First-person point of view and Full GPT-4 will generate the best results.
Step 4: Image Settings
Generated images will be hugely based on the content of your H2 and H3. You can check this link for more information on generating AI images.
Step 5: Publishing Settings
Select a site where you want to auto-publish your article to once it is completed. You may check the WordPress publishing Guide for more information.
Step 6: Add to Writing Queue
Click the "Add to Writing Queue" button to begin generating your article. The process may take up to 10 minutes, depending on your specifications.
Best Practices
- If you have complex writing styles, choose default writing style and break down each group of writing instructions into initials, follow-up and further writing instructions.
- Activate Entity Enrichment to enhance the density of entities in your content.
- Enable FAQs to optimize the use of input keywords.
You have reached the end of the Content refiner! All that’s left to do now is to sit and wait for your article to be generated.